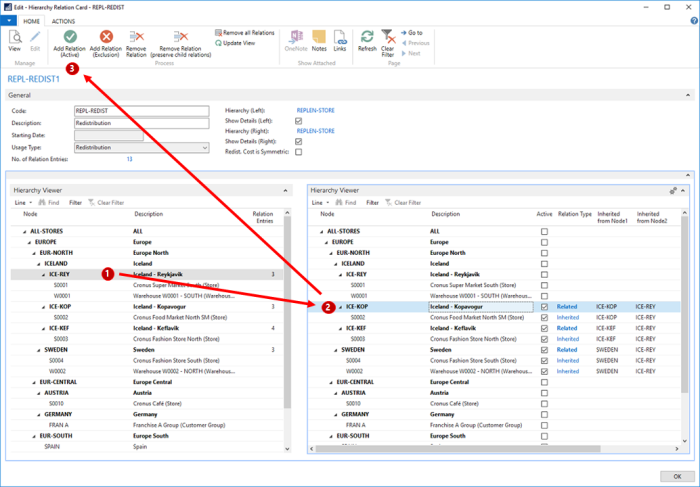
Store Stock Redistribution supports different strategies to calculate the trips between the store and/or warehouse locations to redistribute items. The Redist. Matrix is based on the Hierarchies and Hierarchy Relations model and is used to define between which locations trips should be calculated and to provide a prioritization between the possible locations.
To set up a Redist. Matrix
- Click the
 icon, enter Hierarchy Relation, and select the relevant link.
 - Click the New action to create a new Hierarchy Relation.
- Fill in the Code and Description fields.
- Select the Redistribution option in the Usage Type field.
- Fill in the Hierarchy (Left) and Hierarchy (Right) fields, selecting same Store hierarchy.
- Click the Edit Hierarchy Relation action menu to open the Hierarchy Relation Card.
- Select the Show Details (Left) or Show Details (Right) check boxes on the General FastTab, if you want to view the store or warehouse location(s) under a Node.
- Select a Node in the left Hierarchy Viewer.
- Select a Node in the right Hierarchy Viewer.
- Click the Add Relation (Active) action to establish a relation.

In the above example, a Relation between the group Nodes ICE-REY and ICE-KOP was created. Hence, all the store/warehouse locations under both group Nodes are now related. You can check the details in the Redist. Matrix and Redist Matrix Details pages by updating the Redist. Matrix.
Note: Creating relations between nodes is only possible on group node level.
For more information on how to work with relations in Hierarchies see Hierarchy Relations .
To update Redist. Matrix
- Once the relations are created for all the desired locations, click Actions - Replenishment - Update Redist. Matrix on the Hierarchy Relation Card.
- Click Actions - Replenishment - Show Redist. Matrix to open the Redist. Matrix page.
- On the Redist. Matrix page, click Show Details to open the Redist. Matrix Details page.
See Also
How to: Edit Hierarchy Relations